
This details how to implement the Adaptive Plugin for CTS players and how to upload a custom plugin for CTS.
Installing the CTS Adaptive Plugin
This install involves creating the IRIS.TV skin, adding the IRIS.TV Adaptive Plugin to your player, and then adding the skin objects to your player plug-ins and basic settings in MPX.
Step 1: Setting up the IRIS.TV Skin (With Thumb Controls)
Go to http://data.player.theplatform.com/player/client#data and login with your credentials. Please make sure you add mpx/ in front of your username.
Example:
Username: <username/email>

Login with: mpx/<username/email>
Once logged-in, submit the IRIS.TV plugin by selecting the following:
- Select Accounts: click the drop-down menu and select your account.
- Set the "Object" to "Skin"
- Set the "Form" to "cjson"
- Set the "method type" as "POST"
POST Body: The following body is used to create a plugin
{
  "title": "Iris Skin",
  "swfUrl": "https://d1v4mfkbpjku1v.cloudfront.net/theplatform/glass.json",
  "thumbnailUrl": "https://d1v4mfkbpjku1v.cloudfront.net/theplatform/thumbs_up_liked.png"

}
Click SUBMIT to create the skin
This will add IRIS.TV to the player skins available on the list of plugins of the CTS MPX Portal. Once the IRIS.TV skin is added, you can go to the CTS console to add the IRIS.TV plugin.
Step 2: Adding the IRIS.TV plugin
Go to http://mpx.theplatform.com/#/login and insert your access credentials: username and password.
At the time when you will login in CTS you will see the following:

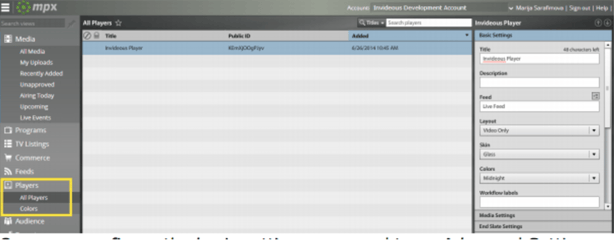
Go to the Players>All Players tab and select the player that you want to add the IRIS.TV plugin to.
Refer to the following guide for creating players in MPX: http://help.theplatform.com/display/xco/Video+-+Creating+players+in+mpx
Then click on the Plug-ins button (tab on the right) and from the drop-down list choose the Iris Adaptive Plugin.
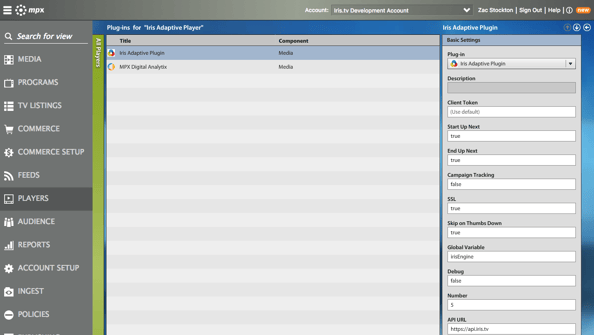
Under the Basic Settings panel, add your Client Token that has been provided by IRIS.TV.
You can also configure Start Up Next, End Up Next, Campaign Tracking, SSL, Skip on Thumbs Down, Global Variable, Debug, Number, and API URL.
Click SAVE.
Step 3: Adding the IRIS.TV Skin Object
Return to the Players>All Players tab and re-select the player that you want to add the IRIS.TV custom skin to (Players>All Players).
In the Basic Settings panel, choose the “IRIS Adaptive Skin”.
Click the “Advanced Settings” section on the Basic Settings panel
Add the code below to the “Player control rack XML”
<control id="tpButton" icon="IconThumbsUp" callback="irisplatformPlugin.thumbsUpClicked"/>
<control id="tpButton" icon="IconThumbsDown" callback="irisplatformPlugin.thumbsDownClicked"/>
Sample Skin Object with IRIS.TV buttons included:
<?xml version="1.0"?>
<layout>
    <controls>

        <region id="tpAdCountdownRegion">
            <row id="tpAdCountdownContainer" percentWidth="100">
                <control id="tpAdCountdown" text="Your video will resume in {remainingTime} {second|seconds}"/>
            </row>
        </region>
        <region id="tpBottomRegion">
            <row percentWidth="100">
                <control id="tpTitle"/>
            </row>
            <row>
                <control id="tpPlay"/>
<control id="tpButton" icon="IconPrevious" callback="previousButtonClicked" label=""/>
        <control id="tpButton" icon="IconNext" callback="nextButtonClicked" label=""/>
                <control id="tpVolume"/>
                <group percentWidth="100">
                    <control id="tpScrubber"/>
                    <spacer/>
                    <control id="tpCurrentTime"/>
                    <control id="tpTimeDivider"/>
                    <control id="tpTotalTime"/>
                    <spacer/>
                </group>
                <control id="tpCC"/>
                <control id="tpBandwidth"/>
                            <control id="tpButton" icon="IconThumbsUp" callback="thumbsUpClicked"/>
                <control id="tpButton" icon="IconThumbsDown" callback="thumbsDownClicked"/>

                <control id="tpFullScreen"/>
            </row>
        </region>
    </controls>
</layout>
For more information on customizing the control rack, refer to:
http://help.theplatform.com/display/pdk/Configuring+controls
Click SAVE.
Uploading a Custom Plugin
For clients requiring plugin options not available in the CTS MPX UI, they will need to upload their own version of the IRIS.TV CTS Plugin with custom plugin options.
Step 1: Setting up the IRIS.TV Skin (With Thumb Controls)
Go to http://data.player.theplatform.com/player/client#data and login with your credentials. Please make sure you add mpx/ in front of your username.
Example:
Username: <username/email>

Login with: mpx/<username/email>
Once logged-in, submit the IRIS.TV plugin by selecting the following:
- Select Accounts: click the drop-down menu and select your account.
- Set the "Object" to "Skin"
- Set the "Form" to "cjson"
- Set the "method type" as "POST"
POST Body: The following body is used to create a plugin.
Please ONLY put the client token provided by us in line #19 between the " " >> "plplugin$defaultValue": " "
{
"$xmlns": {
"plplugin":"http://xml.theplatform.com/player/data/PlugIn"
},
"title":"Iris Adaptive Plugin",
"plplugin$jsUrl":"https://ovp.iris.tv/plugins/theplatform/iris-theplatform.min.js",
"plplugin$allowRSS":"false",
"plplugin$playAll":"false",
"plplugin$type":"ad",
"plplugin$iconUrl":"https://d1v4mfkbpjku1v.cloudfront.net/theplatform/thumbs_up_white.png",
"plplugin$componentType":"tpPlayer",
"plplugin$parameters": [
{
"plplugin$name":"client_token",
"plplugin$type":"string",
"plplugin$label":"Client Token",
"plplugin$description":"Client Token.",
"plplugin$visibility":"basic",
"plplugin$defaultValue":" "
},
{
"plplugin$name":"start_up_next",
"plplugin$type":"string",
"plplugin$label":"Start Up Next",
"plplugin$description":"UpNext slate at the beginning of the videos",
"plplugin$visibility":"basic",
"plplugin$defaultValue":"true"
},
{
"plplugin$name":"end_up_next",
"plplugin$type":"string",
"plplugin$label":"End Up Next",
"plplugin$description":"UpNext slate at the end of the videos",
"plplugin$visibility":"basic",
"plplugin$defaultValue":"true"
},
{
"plplugin$name":"campaign_tracking",
"plplugin$type":"string",
"plplugin$label":"Campaign Tracking",
"plplugin$description":"Additional Metrics for Campaign Assets (see Account Manager)",
"plplugin$visibility":"basic",
"plplugin$defaultValue":"false"
},
{
"plplugin$name":"ssl",
"plplugin$type":"string",
"plplugin$label":"SSL",
"plplugin$description":"HTTPS?",
"plplugin$visibility":"basic",
"plplugin$defaultValue":"false"
},
{
"plplugin$name":"skip_on_thumbs_down",
"plplugin$type":"string",
"plplugin$label":"Skip on Thumbs Down",
"plplugin$description":"Skip to the next video after thumbs_down click?",
"plplugin$visibility":"basic",
"plplugin$defaultValue":"true"
},
{
"plplugin$name":"global",
"plplugin$type":"string",
"plplugin$label":"Global Variable",
"plplugin$description":"to be accessed by DOM window",
"plplugin$visibility":"basic",
"plplugin$defaultValue":"irisEngine"
},
{
"plplugin$name":"debug",
"plplugin$type":"string",
"plplugin$label":"Debug",
"plplugin$description":"Debug mode",
"plplugin$visibility":"basic",
"plplugin$defaultValue":"false"
},
{
"plplugin$name":"number",
"plplugin$type":"string",
"plplugin$label":"Number",
"plplugin$description":"Number of Recs (max 20)",
"plplugin$visibility":"basic",
"plplugin$defaultValue":"5"
},
{
"plplugin$name":"api_url",
"plplugin$type":"string",
"plplugin$label":"API URL",
"plplugin$description":"For clients outside of US",
"plplugin$visibility":"basic",
"plplugin$defaultValue":"https://api.iris.tv"
}
]
}
To add other plugin options, map the Plugin Customization Options listed in UI Settings and Customization Options to the following, then add POST body for plugin creation.
{
"plplugin$name":"[name of setting]",
"plplugin$type":"string",
"plplugin$label":"[name of setting]",
"plplugin$description":"[description text]",
"plplugin$visibility":"basic",
"plplugin$defaultValue":"[default setting value]"
}
For example, here's what should be added for Disable Mobile UpNext:
{
"plplugin$name":"disable_mobile_upnext",
"plplugin$type":"string",
"plplugin$label":"disable_mobile_upnext",
"plplugin$description":"Disable UpNext on mobile",
"plplugin$visibility":"basic",
"plplugin$defaultValue":"false"
}
Then, this would be added to the entire POST Body like this:
{
"$xmlns": {
"plplugin":"http://xml.theplatform.com/player/data/PlugIn"
},
"title":"Iris Adaptive Plugin",
"plplugin$jsUrl":"https://ovp.iris.tv/plugins/theplatform/iris-theplatform.min.js",
"plplugin$allowRSS":"false",
"plplugin$playAll":"false",
"plplugin$type":"ad",
"plplugin$iconUrl":"https://d1v4mfkbpjku1v.cloudfront.net/theplatform/thumbs_up_white.png",
"plplugin$componentType":"tpPlayer",
"plplugin$parameters": [
{
"plplugin$name":"client_token",
"plplugin$type":"string",
"plplugin$label":"Client Token",
"plplugin$description":"Client Token.",
"plplugin$visibility":"basic",
"plplugin$defaultValue":" "
},
{
"plplugin$name":"start_up_next",
"plplugin$type":"string",
"plplugin$label":"Start Up Next",
"plplugin$description":"UpNext slate at the beginning of the videos",
"plplugin$visibility":"basic",
"plplugin$defaultValue":"true"
},
{
"plplugin$name":"end_up_next",
"plplugin$type":"string",
"plplugin$label":"End Up Next",
"plplugin$description":"UpNext slate at the end of the videos",
"plplugin$visibility":"basic",
"plplugin$defaultValue":"true"
},
{
"plplugin$name":"campaign_tracking",
"plplugin$type":"string",
"plplugin$label":"Campaign Tracking",
"plplugin$description":"Additional Metrics for Campaign Assets (see Account Manager)",
"plplugin$visibility":"basic",
"plplugin$defaultValue":"false"
},
{
"plplugin$name":"ssl",
"plplugin$type":"string",
"plplugin$label":"SSL",
"plplugin$description":"HTTPS?",
"plplugin$visibility":"basic",
"plplugin$defaultValue":"false"
},
{
"plplugin$name":"skip_on_thumbs_down",
"plplugin$type":"string",
"plplugin$label":"Skip on Thumbs Down",
"plplugin$description":"Skip to the next video after thumbs_down click?",
"plplugin$visibility":"basic",
"plplugin$defaultValue":"true"
},
{
"plplugin$name":"global",
"plplugin$type":"string",
"plplugin$label":"Global Variable",
"plplugin$description":"to be accessed by DOM window",
"plplugin$visibility":"basic",
"plplugin$defaultValue":"irisEngine"
},
{
"plplugin$name":"debug",
"plplugin$type":"string",
"plplugin$label":"Debug",
"plplugin$description":"Debug mode",
"plplugin$visibility":"basic",
"plplugin$defaultValue":"false"
},
{
"plplugin$name":"number",
"plplugin$type":"string",
"plplugin$label":"Number",
"plplugin$description":"Number of Recs (max 20)",
"plplugin$visibility":"basic",
"plplugin$defaultValue":"5"
},
{
"plplugin$name":"api_url",
"plplugin$type":"string",
"plplugin$label":"API URL",
"plplugin$description":"For clients outside of US",
"plplugin$visibility":"basic",
"plplugin$defaultValue":"https://api.iris.tv"
},
{
"plplugin$name":"disable_mobile_upnext",
"plplugin$type":"string",
"plplugin$label":"disable_mobile_upnext",
"plplugin$description":"Disable UpNext on mobile",
"plplugin$visibility":"basic",
"plplugin$defaultValue":"false"
}
]
}
Once the all options are added, Click SUBMIT to create the plugin
This will add IRIS.TV to the player plugins available on the list of plugins of thePlatform MPX Portal.